Time Saving Tips and Tricks
Organise your Apps into folders
To create a folder all you need to do is hold your finger down on an app until they all start to jiggle, then drag the app on to the top of another app that you want to put in the same folder, and release.
Your iPad will create a folder with both the apps in. The folder will be named according to the category of the apps it contains, but you can rename it as you like.
Multi-tasking between Apps
Double-tapping the Home button shows you all the apps that are currently open/running on your iPad in a bar along the bottom of the screen. To switch to a running app just tap on it in this bar. Swipe the screen downwards to remove this bar.
Don't forget these open apps can chew up the battery, so it's wise to regularly close those that you're not using. Just hold your finger down on one of the app icons in the bar and a small red circle with a line through it will appear on top of it. Tap the circle to close the app.
You can also switch between apps if you have "Multi-tasking Gestures" turned on (Settings > General). Using four or five fingers swipe left or right to switch between apps that are open.
Take an iPad screenshot
You can take a screenshot on your iPad by pressing Home and then the Sleep/Power button at the same time. The screen will flicker and you'll hear a camera click, indicating that a photo has been taken. Your screen shots are saved automatically to the camera roll in your Photos gallery (look for the app icon "Photos"). Here, you can view or email them as you see fit.
Search your iPad
You can easily search your iPad for emails, contacts, calendar events, apps, music etc. On the initial homescreen tap the home button once and the search box will appear. Results are categorised by the type of item that's been found. Try using voice to give it a search query by tapping the microphone key on the keyboard and speaking your query. If you have a lot of stuff on your iPad you can refine searches and exclude different types of items such as music, videos etc. See Settings > General > Spotlight Search.
Add frequently used Apps to the dock tray
The dock tray is the very bottom row of apps that remains fixed when switching between homescreens. This is where you put your most frequently used apps, so that they're always handy. When you first get your iPad the apps that appear in the dock are Safari, Mail, Music and Videos. You can take any of these out and replace them with others. Up to 6 apps will fit in the dock. Hold your finger down on app icon until it starts to jiggle, then, without taking off your finger, drag it to the dock. If there's room left on the dock it will be placed there. You can do the same to remove apps from the dock.
View and configure notifications
Some apps, depending on their settings, will send you notifications of updates or new activities e.g. a mention on Facebook, a new follower on Twitter, or a news headline from a news app. You can see them at any time by holding your finger down on the time display at the very top of the screen and dragging it down. The notifications are categorised by app. There are 2 different ways you can change notification settings if you no longer want to get notifications from a particular app, or you want it to be more selective about what it notifies you about. For most apps you can go to Settings - in the left menu, if you scroll right down, you'll see a list of all your apps. If you tap on any of them you'll see the settings for that app, including "alerts" or "notifications" if the app has them. Some apps require you to open the app itself to change its settings and will have a Settings button somewhere in the app interface.
Add a frequently visited website link to the homescreen
If you visit a website regularly you can create a shortcut to it on your homescreen, so that when you tap it, it will open Safari and the website straight away, saving you time looking for the bookmark or entering the URL. To do this, open Safari and find the website you want to create a shortcut for. When the website displays, tap the button to the left of the URL bar at the top (the rectangle with an arrow emerging from it). Tap "Add to homescreen", enter a name for your shortcut, then tap Add. You'll now notice a new icon on your homescreen.
Keyboard Tricks and Shortcuts
Caps lock: To type an uppercase letter with the onscreen keyboard, first tap the left or right shift key (the upward pointing arrow), then the letter. If you need to type a whole word in caps, lock caps by double tapping either shift key. Double tap to unlock.
The hidden apostrophe and quotation marks: To save time from switching to the symbol keyboard to find the quote marks or apostrophe, you can hold your finger down on the exclamation [!] key for an apostrophe, or question mark [?] for quotes. Slide your finger up without taking it off the screen and touch the hidden key.
Shake to undo/redo: To quickly undo something, such as some typing you want to discard, instead of using backspace on the keyboard, give your iPad a vigorous shake. If you need to redo it, shake it again.
Quick start a new sentence: Double tap the space bar to insert a full stop followed by a space to get started on your new sentence without having to look for the full stop key.
Positioning the cursor: To move the cursor to a particular position in a word to make an edit, hold down your finger on the word until the magnifying glass appears then, keeping your finger on the screen, slowly drag it to the left or right of the word to reposition the cursor.
Selecting text: Hold your finger down on the word you want to select or the word at the end of the text block you want to select. Take your finger off when the magnifying glass appears and tap Select on the menu that pops up. You'll then notice the word is highlighted and has two 'handles' on each end (the blue circles). By holding down and dragging a handle with your finger you can select a whole block of text.
Copy and paste: After selecting a piece of text, take your finger off and you'll see a menu with cut and copy options, tap the option you want. You can then paste the text into any app that has text input by just tapping the screen at the position you want to paste the text, then selecting Paste from the menu that pops up.
Keyboard shortcuts: If you find that you use a lot of common phrases in your typing, you can create shortcuts for them to save retyping them continuously. Go to Settings > General > Keyboard > Add New Shortcut. Enter the phrase and then your shortcut keys e.g. phrase: "Needs referencing!"; shortcut: nrf. So each time I type "nrf", the phrase "Needs referencing!" will be inserted.
17 Tips and Tricks Demonstrated
Real iPad Magic
Displaying your iPad on a big screen
There are two ways of projecting your iPad display onto a big screen. First, via a cable, you can connect your iPad to a HDMI or VGA input using the display adapter mentioned in the accessories section below.
The other is doing it without cables which gives you the freedom to move around in a presentation or pass the iPad around to students in your class for collaborative input. You can do this by making use of the iPad's AirPlay feature.
AirPlay comes with iPad 2 or newer or iPhone 4S or newer, and allows you to connect your iPad wirelessly to other devices that support AirPlay, such as a Mac, Apple TV, or some hifi systems.
To turn on AirPlay and connect to another device, double tap the home button to display the multi-task bar. Place a finger on the bar and swipe to the right - that should reveal your music player controls (as pictured). If the iPad detects an AirPlay compatible device on the network it will also display the AirPlay button next to the volume slider. Tap the button and select the device to connect to. Make sure Mirroring is on too.

With the app Reflector ($13) installed on your Mac or PC you can use AirPlay to mirror your iPad display and audio wirelessly on your computer which you can then connect to a projector. Reflector even allows you to capture the mirrored session to video.
For AirPlay to work, your iPad and computer must be connected to the same wifi network. Unfortunately, the UniSA and EduRoam networks don't allow AirPlay connections, but to get around this you can create your own wifi hotspot with your smartphone which you can then connect your iPad and computer to. Here's some info for doing that with an iPhone or Samsung Galaxy S.
Full size or Mini?
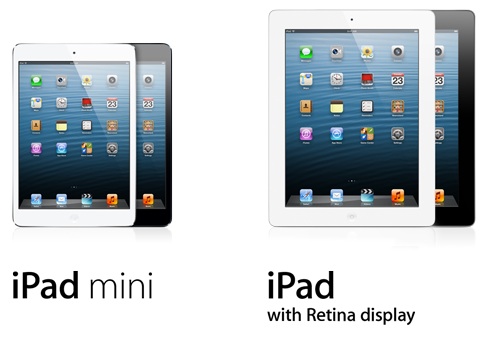
Aside from Retina Display, the iPad Mini has exactly the same specs as the latest version of its big brother. Even the camera and processor are the same. Deciding which one to buy is a matter of personal preference and how you intend to use it. If you intend to use it mostly for reading, especially books, then the smaller light-weight Mini can be held more easily in one hand and will probably suit you better. If you're going to use it for more productive or creative pursuits then having a bigger screen makes life easier.
Accessorise your iPad
Bluetooth Keyboard
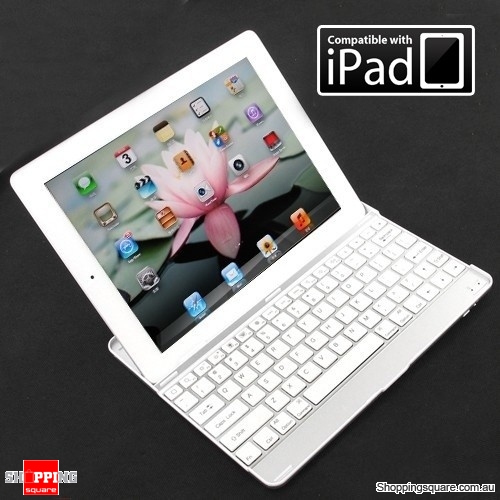 For a true touch typing experience Bluetooth keyboards are great. There are many different styles on the market. This particular one also doubles as a light-weight case and is only $18.95. It is rechargeable via a USB cable. There are also keyboards designed to fit the iPad Mini.
Stylus
A stylus is handy for drawing, painting, and onscreen mark-up or annotation. There are many different kinds from very basic, to crayolas and even brushes for an authentic painting experience. They start at about $10 for a basic one, or even cheaper on eBay. For the serious illustrator, a touchmate glove is essential to prevent your hand from coming in contact with the screen whilst drawing.
 |
 |
Display Adapter
 The HDMI display adapter allows you to plug your iPad into a screen with a HDMI connection to display your iPad on a larger screen - most modern TV's and some computers have HDMI inputs. There is also a VGA adapter to connect your iPad directly to a projector. Before buying one, make sure the one you buy is for the correct connector for your iPad - new iPads have a smaller 'lightning' connector, different from the 30 pin dock connector in the cable pictured. There is a HDMI adapter for lightning too.
Protective Case
There are hundreds of different types of cases around, in different styles, colours, materials, and levels of protection/durabilty. It's wise to have one - iPads are very expensive to repair or replace! Check out Macfixit for loads of different cases and many other iPad accessories at reasonable prices.
"How am I looking today, Siri?"

Siri is the intelligent personal assistant that helps you get things done just by asking. Use your voice to ask Siri to send a message, schedule a meeting, give you a weather report, look up something on Wikipedia, and more.
Siri is available on 3rd generation iPads or newer, and iPhone 4S or newer.
To awaken Siri, hold down the home button for 2 seconds until the microphone symbol appears. It will beep when it's ready for you to talk and again when you've stopped talking. To ask additional questions just tap the microphone. Press the home button to close Siri.
If Siri doesn't appear and you have a compatible device, you might need to enable Siri in your settings. Settings > General > Siri (you can also change Siri's native tongue).
Setting up UniSA wifi, email and calendar
What's your Favourite App?
Click this link then double click on the iPad to add your Apps.
Essential and Recommended Apps
The following is a list of many of the apps demonstrated in the workshop. Some, such as DropBox, Evernote, GoodReader and iAnnotate, I consider are in the 'essentials' category. The others are recommended, and many of them are free, so why not give them a try!
Note: Clicking the app icon will take to you to the App Store page to download the app, and clicking the "learn more" links will take you to more information and example uses of the app.
Apps for Managing and Sharing files
Bump is an app for iPhone and Android that allows you to exchange files between devices by simply 'bumping' the two devices together with a fist bump. Especially handy for transferring photos from one device to another. You can download the iPhone version for the iPad, but search the App Store for iPhone Apps to find it. Bump is free. Learn more.
Dropbox is a cloud storage service that gives you 2Gb of free file storage. It allows you to share files very easily between your iPad, phone, laptop and desktop computers. Installed on your computer, it creates a folder like a network drive, that syncs any file you put in it with all your devices. On the iPad it can act as a surrogate file system as it is integrated into many other apps, enabling you to save files from those apps to your Dropbox folder. You can also create other folders inside your Dropbox folder and share them with other people to work collaboratively on documents. Learn more.
Apps for Notes and Documents
Evernote is a free cloud service for creating, managing and storing your notes. Unlike the iPad's default Notes app, you can access your notes on any computer or device either through the app or on Evernote.com if you don't happen to have a device handy with the app on it. It comes with some simple text formatting tools, and you can categorise your notes into different notebooks and apply tags to them making them easy to find again. You can also save web clips (parts of web pages), images and documents as notes. There are companion apps for Evernote, such as 'Food' which, if you have a notebook for recipes, presents them in a nice recipe book. The Skitch app allows you to draw, add shapes and annotations on to your notes. Learn more.
GoodReader is a file viewing app that provides an interface to your cloud storage services such as Dropbox, Google Drive and iCloud. With it you can create multiple connections to manage and view all your documents. It includes support for viewing PDF, Word, Excel, PowerPoint, images, audio and video. It includes an annotation tool for marking up PDF docs. It also allows you to open documents in other apps, zip and email files, and sync files between different connections. Approx. cost $5. Learn more.
iAnnotate is an app for annotating PDF, Word and PowerPoint files. It includes a lot of very useful annotation tools, especially for marking assignments, such as tools for commenting, highlighting, underlining, voice note recording and a variety of stamps you can choose from. You can save annotated documents into Dropbox, or email them directly from the app. Approx. cost $10. Learn more.
Pages is Apple's answer to MS Word, and their iPad version is a slightly cutback version of the full feature Mac app. It contains all the usual text formatting tools, as well track changes and search and replace. It's mostly compatible with Word docs, and allows you to save in Word format. Dropbox isn't supported directly but you can share your files via email, iCloud, or send them to another app such as GoodReader that will allow you to save to Dropbox. Approx. cost $10.50. Learn more.
Keynote is Apple's answer to MS PowerPoint. It comes with a range a nice templates/themes for your presentations, and has some great features such as 3D charts and an animation tool to animate visual elements in your slides. It is mostly compatible with PowerPoint, though some features of Keynote are not supported in PowerPoint and vice versa. It allows you to save your presentation as a PowerPoint file. The same sharing options as Pages apply. Approx. cost $10.50. Learn more.
Apps for Learning and Teaching
ScreenChomp is also a free app very similar to Educreations, produced by TechSmith the maker's of SnagIt, Camtasia and Coach's Eye. The benefits of ScreenChomp over Educreations is that it gives you a wider variety of annotation tools. You can share your lesson in all the same ways as Educreations, but it also allows you to download your lesson from their website as an MP4 video, which you can keep for prosperity or put onto YouTube, or Echo360 etc. Learn more.
TouchCast is a fantastic free app that enables you to make an interactive video presentation using all kinds of artefacts, such as images, web pages, Twitter feeds and Facebook content. The artefacts are embedded in clickable widgets that are overlaid on to your video presentation. You can invite your audience to click the widgets to create a dual content stream - the video continues playing in the corner while the item you clicked opens full screen, allowing your audience to fully explore the artefact. The downside is that the videos currently can only be viewed in the Chrome or Safari web browsers, or on an iPad/iPhone within the app itself. Learn more.
PortfolioUp is a handy (and free) app that allows teachers and students to capture photos and video with their iPad or iPhone camera and upload them directly to Mahara (the ePortfolio system). In the app settings, just enter the URL http://ep.unisa.edu.au and enter your UniSA username and password (you'll need to have logged in to the ePortfolio at least once before using this app in order to have your ePortfolio account created). The app allows you to attach tags and meta-data to your media artefacts and specify the folder in your ePortfolio file area to upload to. Learn more.
Popplet is an app for creating mind maps, timelines, and for collaborative brainstorming. It's great for connect your ideas on a topic, concept or theory, or as a collaborative group exercise as an alternative to a wiki. It's a very easy tool to use and allows you to incorporate in your mindmap nodes, images (your own, or images from Flickr) as well as YouTube videos. There's a free lite version which gives you a limited number of mindmap projects. You can link to your Popplet mindmap from your course site or even embed it in a page. Learn more.
Creative Book Builder is, as the name suggests, an app for creating and publishing ebooks. Quickly and easily build a book with chapters, images, audio and video, links, math equations (LaTeX), drawings, tables and even multiple choice questions. Your books can have either free flowing text or a fixed text layout. Publish your work to either PDF or ePub formats - ePub can be read by most eBook readers, inlcuding the iBooks app, and has better support for multi-media content. Approx. cost $4.50. Learn more.
TED - Everyone loves a good TED Talk, and with the free TED app you can have quick and easy access to the entire TED library of more than 1,400 talks from some of the world's brightest minds. The app will allow you to create Playlists of your favourite talks and even download them to your iPad video collection for watching when you're offline - great for a long flight! Use AirPlay or your HDMI adapter to watch them on the big screen. Learn more.
iTunesU is a bookshelf app like iBooks that organises content you download via iTunes from the iTunesU 'channel'. iTunesU is a huge collection of course materials from numerous Higher Ed and K-12 providers around the world. You can subscribe to courses that are made up of various topics or themes which are presented as video or audio podcasts, ebooks, and PDFs. They are categorised by discipline, or you can browse by university or school. Learn more.